

🔒 Hello, this is Valentina with a premium issue of the Optivem Journal. I help Engineering Leaders & Senior Software Developers cover legacy code with acceptance tests, using AI. This article is part of the Acceptance Testing in Legacy Code with AI series. To get these articles in your inbox every week, subscribe. Until Tuesday, November 17, an annual subscription is 20% off.
Before we automate any use case with acceptance tests, we need two things:
1. Minimal Pipeline: gets the system onto the acceptance environment the same way every time. Acceptance tests run against the deployed system, so when one fails, we need to know the feature broke, not the deploy.
1.1 Dockerfiles
1.2 Docker Compose
1.3 Smoke Tests
1.4 Commit Stage
1.5 Acceptance Stage
1.6 Release Stages
2. Use Case Diagram: the actors, the use cases and the external systems. Every acceptance test covers one use case, so the diagram shows us what there is to test and which use case to start with.
2.1 Ask the Product Owner
2.2 Generate the Use Case Diagram
2.3 Review with the Product Owner
Where relevant, we give you the AI prompt for each step.
This is Phase 0 of the series Acceptance Testing in Legacy Code with AI.
In the next article, we pick the core use case and write its use case narrative and business rules.
1. Minimal Pipeline
The pipeline has four stages. Every stage after the commit stage has its own environment.
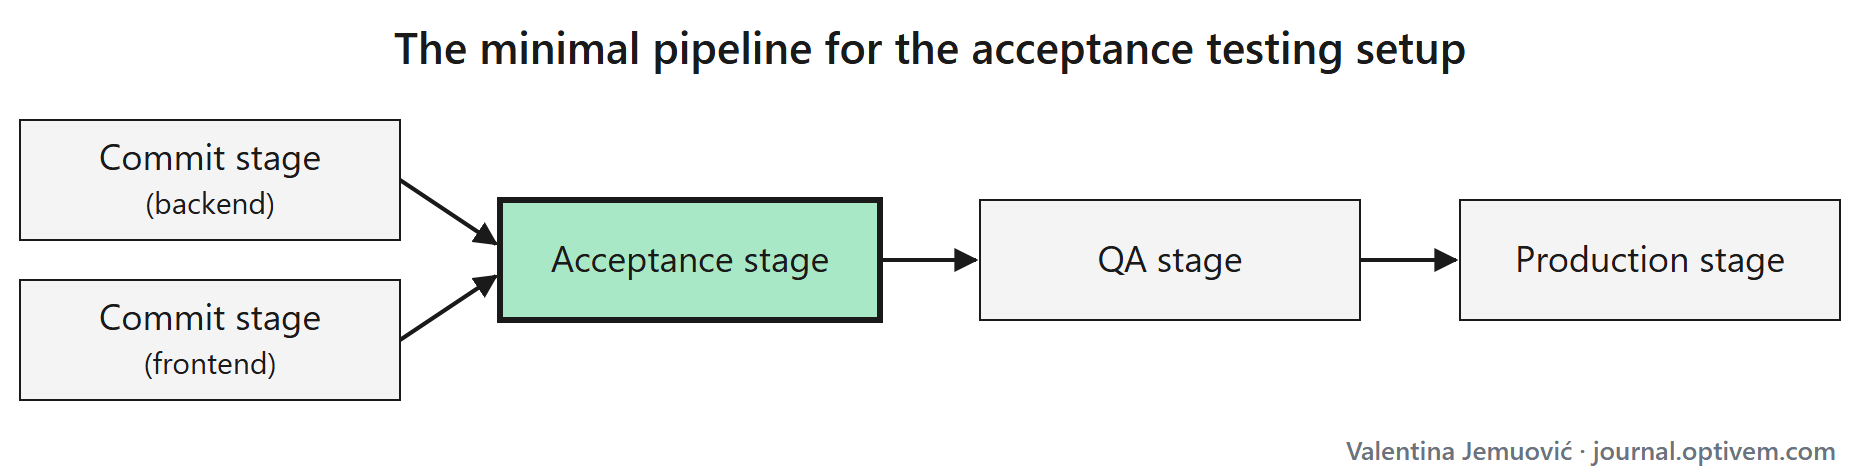
Commit stage: one for each deployable component, such as the backend and the frontend. Compile the code, build the Docker images, publish them to the Docker registry.
Acceptance stage: deploy to the acceptance environment, run the smoke tests.
QA stage: deploy to the QA environment, run the smoke tests.
Production stage: deploy to the production environment, run the smoke tests.
Unit tests, component tests and static code analysis go in the commit stage too. Acceptance testing doesn’t need them, so we leave them out of this series.
Notice what’s missing from the acceptance stage: acceptance tests. They don’t exist yet. We build them later in the series.
The acceptance, QA and production stages all do the same two things: deploy the system, then run the smoke tests. So we write those two steps once and reuse them in all three.
Why go all the way to production? If you deploy to acceptance one way and to production another, a release can work on acceptance and still break in production. If all three stages deploy the same way, every deploy to acceptance is practice for production.
1.1 Dockerfiles
No Dockerfiles yet? Write them first. They also tell you whether anyone can still build the system from a clean checkout.
AI prompt: Write a Dockerfile for each deployable component:
one for the backend,
one for the frontend.
Find out how each is built and started today from the build scripts, the deployment scripts and the README. Build each from a clean checkout, using nothing from a developer’s machine. Don’t change the system’s code.
Docker is the most common choice, and we recommend it wherever the system can run in a container. But it’s optional. If the system can’t run in a container, deploy it to a real server with the scripts you already have. You lose one thing: running the same setup on your machine and in the pipeline. You keep the most important one: every environment is deployed the same way. Without Docker, swap the Docker images for your build artifacts (such as JAR files or zip packages) and the Docker registry for your artifact repository. Run the system on your machine the way you do today; the steps stay the same.
1.2 Docker Compose
Write a Compose file to run the system on your machine. You use it to run the smoke tests locally before they go into the pipeline:
AI prompt: Write docker-compose.yml in the repository root:
Build the backend and the frontend from their Dockerfiles and start them.
Start everything they need to start, such as the database and the login server.
Point each external system to its test instance.
Find every setting the system reads at startup in the deployment scripts and the README, and set each one in the compose file.
Don’t change the system’s code, with one exception: if an external system’s URL is hard-coded, move it into the system’s configuration.
One rule: external system URLs must be settings, not hard-coded. It’s the only change we make to the system’s code.
Example of the generated file, trimmed to the backend and the frontend:
services:
  backend:
    build: ./backend
    ports:
      - "8080:8080"
    environment:
      - ERP_API_URL=https://test.erp.com
      - TAX_API_URL=https://test.tax.com
      - CLOCK_API_URL=https://test.clock.com
  frontend:
    build: ./frontend
    ports:
      - "3000:3000"
Why build the images locally instead of pulling them from the Docker registry? The registry is still empty: the commit stages that publish the images come later. And on your machine, you want to run the code you just changed.
Why make external system URLs configurable? Later in the series we replace the external systems with stubs, and that only works if the URL is a setting.
